
I've have played, and reported, this battle before a couple of times, which means that I already have a potted history ready to go.
The Battle of Chacabuco was fought on 12th February 1817 in Chile. Briefly, the patriot general San Martin marched an army across the Andes from Argentina with the aim of liberating Chile from Spanish rule, allying with an Army under the Chilean patriot Bernardo O'Higgins. A force of Royalist troops, under General Maroto were rushed to meet them, and blocked their advance at Chacabuco Valley.
San Martin attacked the small Royalist force, splitting his forces such that part of his army, under O'Higgins, would hold the Royalists to their front, whilst the other part, under General Soler, would march by narrow mountain paths around the Royalist left and attack them there. The plan worked up to a point. Initially O'Higgins just exchanged fire with the Royalist line, but then for reasons still not clear, he attacked. This could have been due to a certain impetuosity on his part, or it has been suggested that he saw the Royalists about to advance from their positions and was concerned that he would be trapped in the narrow valley through which he was advancing. Whatever the reason, his attack spurred San Martin to take direct control of the battle, ordering his elite Horse Grenadiers up in support. At that moment, Soler arrived on the Royalist left, and the combined attack collapsed the Royalist army. Part of it rallied at a farm in the Royalist rear. but it was soon forced to surrender.
The bulk of the Royalist forces fled Chile and O'Higgins was installed as Supreme Director. Whilst Chile's complete liberation wouldn't occur for another year or so, this was the beginning of the end for Royalist rule.
The battle is a small one. The Royalists had about 1200 men on the field, whilst the Patriots ended up with about 1500 in action, some of Soler's flank marchers not being engaged at all.
I had some vague plans last year to refight it using Black Powder, but I've never really progressed them To be honest, I can't rouse the enthusiasm when I know that my own 'Liberated Hordes' HOTT variant gives a perfectly acceptable game. So it's those rules I turned to today.
I used the following OOBs
Patriot - Five Regular Infantry and two Elite Cavalry in the main force with one Regular Infantry and one Elite Cavalry in the flanking force.
Royalists - Five Regular Infantry, one Regular Skirmisher, one regular Artillery and one Militia Cavalry.
This is based roughly on one base being equal to 200 infantry or 100-150 cavalry.
San Martin went for a bold plan - lead the elite Horse Grenadiers straight into the valley at full speed, and sweep away the Royalist left flank. If things got sticky, then the flank march would turn up and save the day. Maybe.

The Patriot infantry (under the ever wonderfully-named Bernardo O'Higgins) plodded forward. Royalist skirmishers engaged them from the rocky slopes, but O'Higgins' men drove them off with a single volley.
On the day O'Higgins was ordered to just pin the Royalist forces, but ended up charging them when it seemed that Soler's flank-march wasn't going to appear. In this setup he isn't really very impetuous. I'd be inclined to add in a future rule that requires San Martin to always have to expend 1 PIP on the infantry until at least one element has engaged in close combat.

But I digress. San Martin's horse sped down the valley.

With his own cavalry of dubious quality, and also outnumbered, Maroto wasn't going to opt for a straight fight. He redeployed the cavalry so that it was supported by the infantry on that flank, and swung his artillery around to cover the gap between the two areas of high ground.

The repositioning of the guns left San Martin unable to launch both groups of cavalry at the small hill, so in a swift change of plan he swept up the hill towards the Royalist guns. An unlucky combat here could have seen one, or both, cavalry lost, and there was also the danger of becoming pinned in combats which would then allow the Royalist troops on the hillock to come in from the rear.

The artillery was destroyed, but Maroto ordered his left flank into the rear of the Horse Grenadiers.

The elite Argentinian horse saw them off with ease.

With the Royalist flank exposed, San Martin personally led a charge against the main Royalist infantry line, an Maroto's command post itself.

The Royalists fought like tigers ...

... but were swept away

The Royalist army broke. The Patriot infantry had barely been engaged; the Horse Grenadiers won the battle on their own. Soler's flank-march never appeared.

I set the battle up again, and opted for the same plan; hurl the cavalry down the valley for the quick win. Maroto's artillery was positioned to cover this from the start, and this time the cavalry was moved to support it as well, on the hope that the up-slope advantage would assist them against the better quality Argentinians.

As San Martin prepared to charge, Royalist infantry moved to support the guns and cavalry. This was no longer a good place for a headlong charge.

On the other flank the Royalist skirmishers had a better time of it, driving back some of the Patriot infantry, and slowing their advance.

San Martin order the cavalry to fall back, which it did so, under fire.

Patriot musketry drove off the skirmishers.

Meanwhile Maroto formed up his infantry, and advanced against the Horse Grenadiers, hoping to drive back them onto the rough hill-slopes where they would be at a serious disadvantage.

O'Higgins brought up the infantry as rapidly as possible.

But Maroto's gambit didn't pay off; his infantry fell back, with the Patriot cavalry in pursuit.

The two infantry lines began to exchange fire.

Holes began to appear in the Royalist line, whilst their infantry continued to fall back before the Patriot horse.

A counter-attack saw one of the Horse Grenadier units routed.

But the Patriots were now pushing the Royalists hard.

And at that point, Soler's troops appeared.

At the same time, Maroto suffered a command paralysis, and was unable to exploit a chance to attack San Martin's last cavalry unit.

The Patriots didn't miss their chance, with coordinated attacks along the line destroying the Royalist left and centre, and winning them the battle.

The chaotic final position.

The second battle was a closer game, with a few moments where the Patriots could have come seriously unstuck. San Martin used his commander quality in the mid-game, allowing him to ensure his infantry advanced in support of one of his cavalry charges. Maroto's poor generalship kicked in just as the flank-march appeared, preventing him from mounting an effective response.
This is a difficult scenario for the Royalists to win, really, with their troops and commander being, on average, outclassed and, when the flank-march appears, outnumbered. If I did it again I would probably apply the PIP limit on the infantry described above, and maybe add in some kind of time-limit in order to force a bold Patriot attack and add a little uncertainty.
San Martin was rated as a Good commander, whilst Maroto was rated Poor.
I did make one change to the game. Both armies are quite small, so I felt that a full D6 of PIPs was a bit much, and wouldn't create sufficient command stress. So I used the following: A roll of 1 was 1 PIP, 2-3 was 2 PIPs, 4-5 was 3 PIPs and 6 was 4 PIPs. Maroto's Poor rating would still kick in on rolls of '6', but converting a second 4 PIP roll to 1 PIP. The change worked quite well, forcing both sides to make tricky choices at key moments.
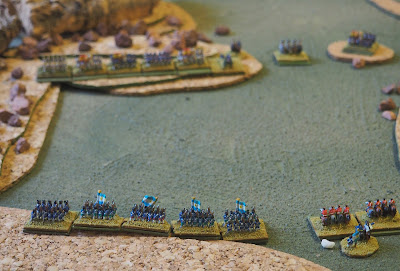
I went for a mostly historical setup. This is the start of the battle from behind the Patriot lines as they enter the valley. The Royalists are formed up in the distance.

San Martin went for a bold plan - lead the elite Horse Grenadiers straight into the valley at full speed, and sweep away the Royalist left flank. If things got sticky, then the flank march would turn up and save the day. Maybe.

The Patriot infantry (under the ever wonderfully-named Bernardo O'Higgins) plodded forward. Royalist skirmishers engaged them from the rocky slopes, but O'Higgins' men drove them off with a single volley.
On the day O'Higgins was ordered to just pin the Royalist forces, but ended up charging them when it seemed that Soler's flank-march wasn't going to appear. In this setup he isn't really very impetuous. I'd be inclined to add in a future rule that requires San Martin to always have to expend 1 PIP on the infantry until at least one element has engaged in close combat.

But I digress. San Martin's horse sped down the valley.

With his own cavalry of dubious quality, and also outnumbered, Maroto wasn't going to opt for a straight fight. He redeployed the cavalry so that it was supported by the infantry on that flank, and swung his artillery around to cover the gap between the two areas of high ground.

The repositioning of the guns left San Martin unable to launch both groups of cavalry at the small hill, so in a swift change of plan he swept up the hill towards the Royalist guns. An unlucky combat here could have seen one, or both, cavalry lost, and there was also the danger of becoming pinned in combats which would then allow the Royalist troops on the hillock to come in from the rear.

The artillery was destroyed, but Maroto ordered his left flank into the rear of the Horse Grenadiers.

The elite Argentinian horse saw them off with ease.

With the Royalist flank exposed, San Martin personally led a charge against the main Royalist infantry line, an Maroto's command post itself.

The Royalists fought like tigers ...

... but were swept away

The Royalist army broke. The Patriot infantry had barely been engaged; the Horse Grenadiers won the battle on their own. Soler's flank-march never appeared.

I set the battle up again, and opted for the same plan; hurl the cavalry down the valley for the quick win. Maroto's artillery was positioned to cover this from the start, and this time the cavalry was moved to support it as well, on the hope that the up-slope advantage would assist them against the better quality Argentinians.

As San Martin prepared to charge, Royalist infantry moved to support the guns and cavalry. This was no longer a good place for a headlong charge.

On the other flank the Royalist skirmishers had a better time of it, driving back some of the Patriot infantry, and slowing their advance.

San Martin order the cavalry to fall back, which it did so, under fire.

Patriot musketry drove off the skirmishers.

Meanwhile Maroto formed up his infantry, and advanced against the Horse Grenadiers, hoping to drive back them onto the rough hill-slopes where they would be at a serious disadvantage.

O'Higgins brought up the infantry as rapidly as possible.

But Maroto's gambit didn't pay off; his infantry fell back, with the Patriot cavalry in pursuit.

The two infantry lines began to exchange fire.

Holes began to appear in the Royalist line, whilst their infantry continued to fall back before the Patriot horse.

A counter-attack saw one of the Horse Grenadier units routed.

But the Patriots were now pushing the Royalists hard.

And at that point, Soler's troops appeared.

At the same time, Maroto suffered a command paralysis, and was unable to exploit a chance to attack San Martin's last cavalry unit.

The Patriots didn't miss their chance, with coordinated attacks along the line destroying the Royalist left and centre, and winning them the battle.

The chaotic final position.

The second battle was a closer game, with a few moments where the Patriots could have come seriously unstuck. San Martin used his commander quality in the mid-game, allowing him to ensure his infantry advanced in support of one of his cavalry charges. Maroto's poor generalship kicked in just as the flank-march appeared, preventing him from mounting an effective response.
This is a difficult scenario for the Royalists to win, really, with their troops and commander being, on average, outclassed and, when the flank-march appears, outnumbered. If I did it again I would probably apply the PIP limit on the infantry described above, and maybe add in some kind of time-limit in order to force a bold Patriot attack and add a little uncertainty.
Impressive, colorful and beautiful units!
ReplyDeleteAgreed, great to see epic scale in action.
ReplyDelete"epic scale"
DeleteI prefer the term '6mm' :)